1. Open the image that was you wanted, then make the selection on face used Magnetic lasso tool or Polygonal Lasso Tool than click CTRL + J to copy the cheek that we this selection, saw the image below:
2. Add the layer mask to the image of the cheek by click "add layer mask" that was under the layer palette. Then should not activate eyes icon in the layer background to facilitate in masking cheek layer. Use Brush tool to do masking, saw the image below :
3. Click layer >> layer style >> Bevel an emboss, than change the setting of layer style with
Style = Inner Bevel
Dept = 300 %
Size = 2 px
Soften = 2 px
And last click "OK"
Saw the image below :
4. Masking to outskirts of the cheek , until getting the image like below:
5. Activated came back eyes icon in the layer background then used Sponge tool in the cheek layer in order to be seen like blood and be coloured rather reddish. Finally used brush tool for coloured the cheek from the layer background so that visible like the bruis.
Congratulations tried!!
Jumat, 26 Desember 2008
Kamis, 25 Desember 2008
Rain Effect
Step by step for "Rain Effect"
If you wanted the method more easy please download Action Rain Effect by pressed "Click Here"
1. For the Actions use after you are open your image was carried out by means of pressed "alt + F9", then click the arrow that was to the right corner upper from the palette action, then click "Load Actions". Search where the place kept Actions that has you download earlier, then click "Load". Saw the image below :
2.Further click "Play" to the Actions palette and "Abrakadabra!!!" Rain Efect immediately so. Please was trie. Saw the image below :
- Open your image with photoshop CS3 or Older
- Made a new layer by pressing layer > > New > > Layer (ctrl + sift + N). then will show the window of New Layer, The contents of the name field with "Rain". Saw the picture below with the red circle :
- Click Filter >> Render >> Clouds, So as in could like the image below:
- Click Filter > > Noise > > Add Noise, then will emerge the "Add Noise" window, fill amount with the figure "94". and then marked distribution field with "Gausian" and gave the sign of the cheque in "monochromatic". Finally click "OK. Saw the image below :
- Click Filter > > Blur > > Motion Blur, then fill angle "-55" and Distance "25" Pixel. finally click "OK". Saw the picture below:
- The difference of the Layer Blending from layer Rain with "screen". Saw the red circle in the image below:
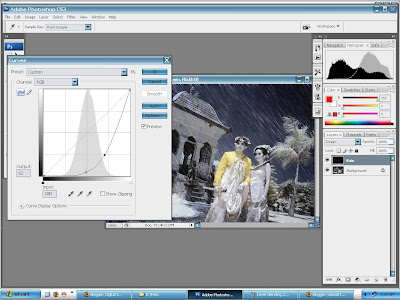
- Pressed "ctrl + m." so that the Curves window appears, then moved the line like the image below then click "OK" :
- Lowered opacity from the "Rain" layer became 75%. finished! The effect of Rain has been.
If you wanted the method more easy please download Action Rain Effect by pressed "Click Here"
1. For the Actions use after you are open your image was carried out by means of pressed "alt + F9", then click the arrow that was to the right corner upper from the palette action, then click "Load Actions". Search where the place kept Actions that has you download earlier, then click "Load". Saw the image below :
2.Further click "Play" to the Actions palette and "Abrakadabra!!!" Rain Efect immediately so. Please was trie. Saw the image below :
IT IS HOPED was successful!!!
Rabu, 24 Desember 2008
Digital Imaging works
Manipulation Photo
Results of the End
His instruction
Results of the End
His instruction
- Open the photo of the "wave" from your computer with Photoshop CS3 or Older(If not yet having the material from this Manipulasi Technique you could download a PSD File with pressed Download link) As the picture was supervised this :
- Copy Image "wave" with pressed "ctrl + J" and then flip Horizontal image with pressed "ctrl + T" >> "Right Click" With the cursor was to the picture >> "Flip Horizontal". Then pressed "ctrl + u" to show the window hue/saturations, the contents saturation with the figure -75 to the small box available in this window . The difference of the regulation in accordance with the red circle to the picture was supervised this :
- Open Image "golden gate" then Drag it to layer "wave" by keeping the click left switch to the image and shifting him in the "Wave" layer, and then fix its In order to be the same as the measurement image "wave". Saw to the image was supervised this:
- Masking image "golden gate" with pressing the switch "add a masking" in the "layer palette" See the image below with red circle :
- Activated your brush tool, arranged opacity to brush 100%, previous carried out the process masking by means of brushing in the image part golden gate until you received results like below :
- Open "Liberty" image then moved it to the "wave" image. Arrange the liberty size, position and rotation with pressed "ctrl + T"to Free Transform it. See the image below :
- Add the layer mask in the layer of the statue liberty, the click icon "add the layer mask" to the layer palette. Then used brush tool for masking until getting results as the image below
- Only was like this that could be explained by me in the manipulation tutorial of this photo, you could add the other object like results of the end of this tutorial that contained the picture of the helicopter, the cloud, lightning, and rain. Click here for the technique made rain
What is Digital Imaging?
Digital Imaging is an editing process from one or some images or photos to become the work it would be better than before. As for software that normally to used it is Adobe Photoshop, Now Adobe already dismissed its latest version of Photoshop, the name is Photoshop CS4. But the beforehand version can also used for the Digital Imaging process, for example Photoshop CS3 or that was older than it. But Photoshop CS3 has been very good to that process.
Example :
Example :
Langganan:
Postingan (Atom)