- Open your image with photoshop CS3 or Older
- Made a new layer by pressing layer > > New > > Layer (ctrl + sift + N). then will show the window of New Layer, The contents of the name field with "Rain". Saw the picture below with the red circle :

- Click Filter >> Render >> Clouds, So as in could like the image below:

- Click Filter > > Noise > > Add Noise, then will emerge the "Add Noise" window, fill amount with the figure "94". and then marked distribution field with "Gausian" and gave the sign of the cheque in "monochromatic". Finally click "OK. Saw the image below :

- Click Filter > > Blur > > Motion Blur, then fill angle "-55" and Distance "25" Pixel. finally click "OK". Saw the picture below:

- The difference of the Layer Blending from layer Rain with "screen". Saw the red circle in the image below:

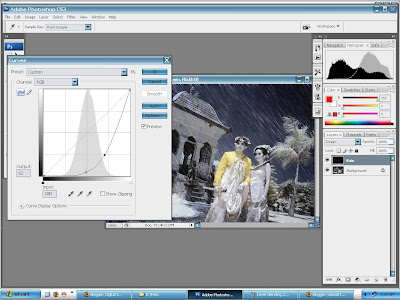
- Pressed "ctrl + m." so that the Curves window appears, then moved the line like the image below then click "OK" :
- Lowered opacity from the "Rain" layer became 75%. finished! The effect of Rain has been.


If you wanted the method more easy please download Action Rain Effect by pressed "Click Here"
1. For the Actions use after you are open your image was carried out by means of pressed "alt + F9", then click the arrow that was to the right corner upper from the palette action, then click "Load Actions". Search where the place kept Actions that has you download earlier, then click "Load". Saw the image below :

2.Further click "Play" to the Actions palette and "Abrakadabra!!!" Rain Efect immediately so. Please was trie. Saw the image below :

IT IS HOPED was successful!!!
Tidak ada komentar:
Posting Komentar